Getting Started with the QuickStart Wizard in Canvas
The DesignPLUS QuickStart Wizard provides beautifully designed templates for Canvas.
Overview of the DesignPLUS QuickStart Wizard
User-friendly and visually appealing design can make your online course materials in Canvas more welcoming and engaging for your learners.
Additionally, consistent design allows learners to more smoothly navigate between content, lowering the cognitive load associated with orienting themselves to different layouts in the course.
The QuickStart Wizard tool in Canvas makes it easy to provide both beautifully and accessibly designed content, and create consistency across your course.
Learn about the QuickStart Wizard
QuickStart Wizard User Guide by DesignPLUS
The QuickStart Wizard information in the DesignPLUS User Guide has a nice video on the Overview page as well as much more helpful information (screenshot of User Guide below).

Accessing the DesignPLUS QuickStart Wizard
When you use the Rich Content Editor in Canvas to create new content, you’ll see the QuickStart Wizard button to the right of the title field at the top of the page. Note: you will also see a button to access the wizard when you are creating new content, not when you are editing existing content.

Click on the QuickStart Wizard button to open the Wizard and choose a template.
Available Templates and Blocks
When you open the QuickStart Wizard, you’ll be able to select either a template (a full page layout) or create your own layout using stylized blocks.
Resources to learn more about accessing the QuickStart Wizard
DesignPLUS QuickStart Wizard User Guide
Use the information in the “Interface” tab of the QuickStart Wizard User Guide (screenshot below) to learn more about the general interface, templates tab and blocks tab.

Visual Guide of the QuickStart Wizard at NC State
For a visual guide of the QuickStart Wizard at NC State, view this screenshot-based guide to accessing the Wizard’s templates.
Templates
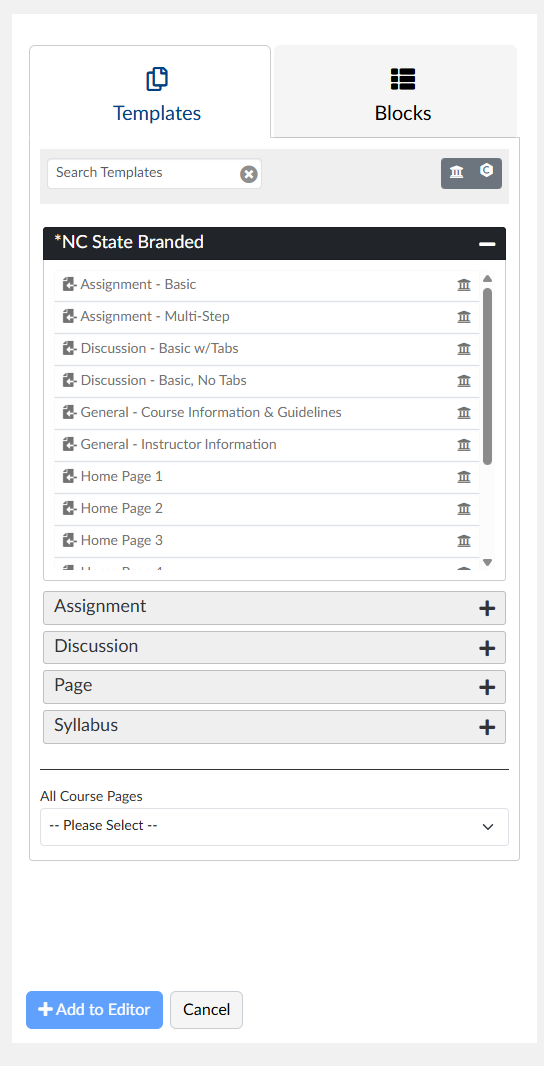
The “Templates” tab (shown at left) is selected by default when you open the Wizard. The top category of templates in the Wizard are NC State Branded templates (category expanded in the screenshot).
These NC State Branded templates are full-page layouts designed with NC State’s branding and best practices applied, and each is appropriate for a higher education setting.
Other template categories (Assignment, Discussion, General, Page and Syllabus) offer additional templates provided by the tool vendor.
At the bottom of the Template tab is the option to select an already created and saved course page to use as a template.
Blocks
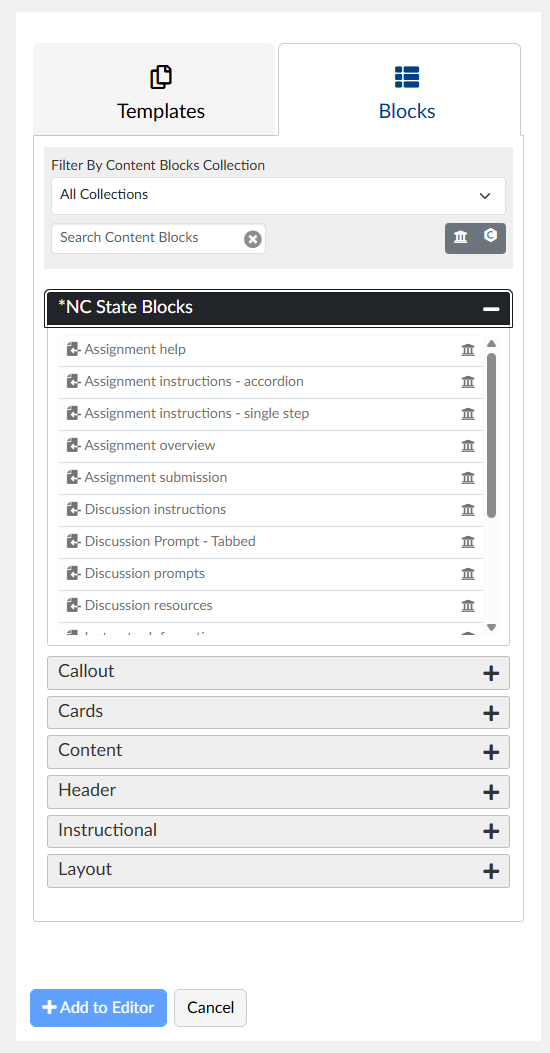
Clicking on the “Blocks” tab (shown at left) allows you to access building blocks for pages, should you want to create your own layout.
NC State Blocks, the top category expanded in the screenshot, includes each of the blocks that you might find in the NC State Branded templates.
The other available block categories (callout, cards, content, header, instructional and layout) provide more options.
When you create content using Blocks, the NC State branded visual theme will automatically be applied to the content of your page, assignment or discussion.
Selecting and modifying a template
Resources to learn more about selecting and modifying a template
DesignPLUS QuickStart User Guide
View the “Instructions” tab of the QuickStart Wizard User Guide (screenshot below) to see the steps for applying a page template, adding content blocks, reordering content, removing content and adding preview content to the Rich Content Editor.

Visual Guide of selecting and modifying and NC State branded template
Once in the Wizard,
- Hover over the name of any template or block to get a glimpse of what the item will look like in a published page.
- Click on the name of the template or block you want to use to load it into the “Content Preview” window of the editor.
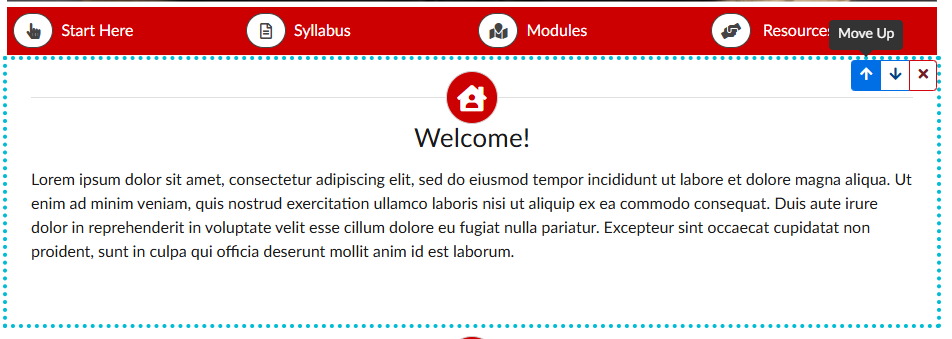
- Once your have selected content and added it to the Content Preview, you can rearrange and delete blocks, or add more using the Blocks tab. When you hover over an area in a template, the block of content is highlighted and three buttons appear at the top right, allowing you to move the highlighted content up or down or delete the block.
- When you are ready to begin editing content, click the “Add to Editor” button at the bottom of the QuickStart Wizard. This will close the wizard and take you to Canvas’s Rich Content Editor, where you can begin filling out your page, assignment or discussion.
Removing editor-only notes in the Canvas editor.
Editor only notes, instructions, and highlighted text in the template or block guide you to add the appropriate content for your course. DesignPLUS calls these “Action Items.” These items are not visible to learners. Still, you may wish to remove them as they may create a distraction for you as you edit.
Once you have finished gleaning any relevant information from the editor-only notes, you can remove them by clicking on the green “Open Action Items” button (a green checklist icon) at the bottom right of your screen (screenshot below).
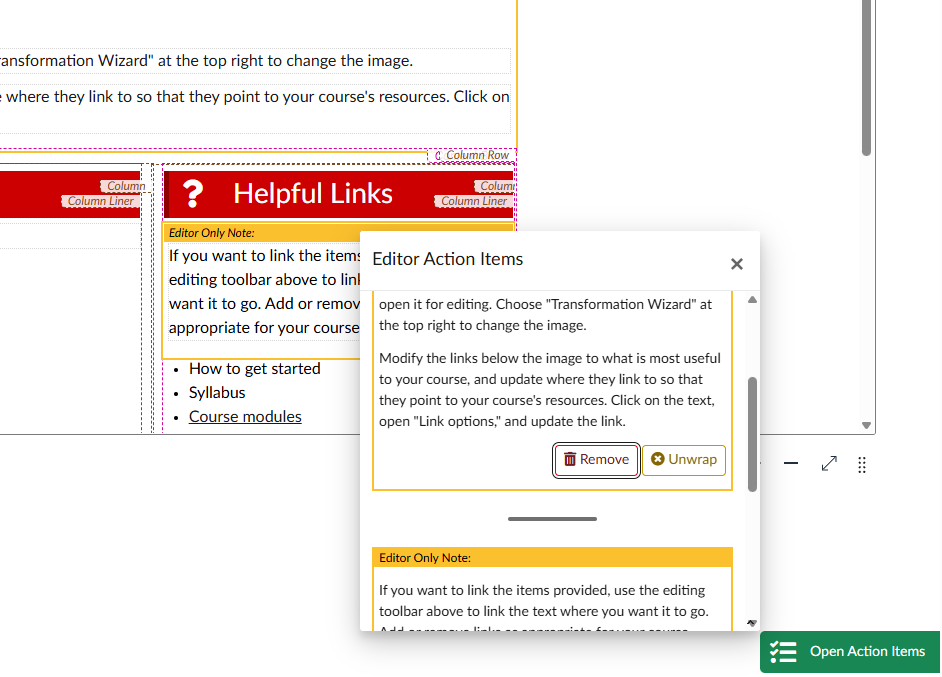
To remove any action item click the button labeled “Remove.” Note: Clicking “Unwrap” will remove the yellow box but leave the text in your editor.
Modifying a template once it’s in the editor
Adding content to your template is easy. You can simply replace text and images with your own using Canvas’s editing interface.
Modifying a template (removing and rearranging blocks) once you have brought the template into the editor is a bit more of an advanced skill. If you expect to want to do more design work than simply filling in content in a template, you may want to check out some of the training on DesignPLUS that is offered by its vendor, CidiLabs (listed blow in the Support and Resources section)
Support and resources
- QuickStart Wizard User Guide from Cidi Labs DesignPLUS
- DesignPLUS Sidebar Introduction is a good starting point for more advanced design work in DesignPLUS. Appropriate if you are comfortable with / interested in more in-depth design work.
- Check out the Upcoming Training from CidiLabs (the DesignPLUS vendor). Be sure to select DesignPLUS training as Cidilabs’s training emcompasses other tools that NC State does not have.
- Use the on-demand resources at the CidiLabs Training Video Hub. The most relevant ones for NC State instructors are
- DesignPLUS Training Series (start with the Sidebar introduction to get a taste of what it’s like)
- DesignPLUS Summer School
- DesignPLUS Video Tutorials (not as easy an entry point as the training series, but good for reference).