Common Accessibility Issues in Online Courses, and How to Fix Them
View Our More Up-to-date Resource
The information here has moved over to our online Digital Accessibility Guide. Please change your bookmarks and use that resource from now on. Looking for other Accessibility resources? View the Accessibility index for Teaching Resources to find more helpful articles.
Below this line –> no longer updated
Making your course accessible can feel like an overwhelming task, but it doesn’t have to be! Many of the tools we use every day have built-in accessibility features that allow you to quickly and easily make your content accessible. Improving the accessibility of your course not only helps your students with disabilities, it also helps you and your other students, by creating more options and gaining access to more features. While every course and topic is different, here are some common improvements that you can make to get started on making your course accessible.
- Formatting Word, Google Docs, and Moodle
- Formatting Powerpoints
- Formatting PDFs
- Videos
- Other Best Practices
- Beyond Technical Access
- Resources
Formatting in Word, Google Docs, and Moodle
To improve the accessibility of Word Documents such as syllabi, assignment instructions, or reading assignments, follow these guidelines:
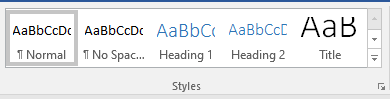
Use Headings
Headings provide information about the organizational structure for screen readers. Just as we might skim through a document looking for the relevant sections, screen readers can do this too, but only if the headings are correctly formatted. Making text bolder and larger is not the same thing as creating headers. Use the built-in headers, and follow the hierarchy so the main headers are Heading 1, sub points are Heading 2, etc. In Word and in Google Docs, the built-in headings will also automatically build a document outline, which is helpful for all students, not just those using screen readers.
Note: You do not have to keep the color/font/style of the built in headers. These can be customized in the menu, so that the built-in headers look exactly the way you want!

Use Lists
Like headings, the built-in list feature provides information to screen readers about how to interpret content. Adding numbers or letters to text is not the same thing as using the list tool when it comes to screen readers. Both Word and Google Docs will try to automatically create a list for you if they get the inkling that you are making a list, so use this feature and then just customize the styles as needed. In Moodle, you can select the text and use the buttons to create numbered or bulleted lists.
Alt Text
Alt text is hidden text that describes an image in a document or website. When a student uses a screen reader, the alt text is read aloud when the reader encounters the image. This text should be short and descriptive, and should be more than just the image title.
- Word: In most versions of Word, you can enter alternate text by right clicking an image and selecting Format Picture. Within the Format Picture dialog, select Alt Text.
- Google Docs: In Google Docs, right click the image and select ‘Alt text…’. You can also select the image and press “Ctrl+Alt+Y”.
- Moodle: In Moodle, every time you upload an image it includes the prompt “Describe this image for someone who cannot see it”. This description becomes the alt text. If the image is purely decorative, such as a border or page design, you can click the box that says ‘description not necessary’, in which case the image will become invisible to the screen reader.
Tables
Tables are useful for visually organizing information, but they can be problematic for screen readers. Tables should not be used purely for formatting or layout and should be reserved for presenting data that requires a table. Simple tables can be made accessible. In Word, the only step necessary for accessibility is to identify which row contains the column headers. To do this, select that row (Table > Select > Row), then right-click the row and select “Table Properties”. This brings up the Table Properties dialog. In this dialog, click the Row tab, and check the checkbox that says “Repeat as header row at the top of each page”.
Defining header rows/columns in Google Docs is not possible unless you are using the free Grackle Docs plug-in. Once installed, follow these guidelines for scanning and remediating all of your Google Docs. Complex data can be formatted on a Google Sheet instead.
Formatting Powerpoints
Like Word docs, Powerpoints have some built in features that support accessibility. When creating your slides:
- Use a built-in template and try not to edit it. Use the existing layout and text placeholders as much as possible. These act as headers and body text.
- Add alt text to images by right-clicking on the image and selecting Size and Position. Within the Size and Position dialog, select Alt Text.
Like with Word Docs, use the built in list and table features, and use them appropriately.
Formatting PDFs
PDFs can be a great format for accessibility, because the reader software is free and platform agnostic. However, to make them truly accessible, there are a few things you must do when creating your PDF.
Reader
The best practice according to the WCAG standards is to include a link to download Adobe Reader any time you are posting a PDF. For your purposes, include a link to download reader somewhere in your Moodle course.
Scans and Other PDFs
If you have a PDF scanned document or a PDF you downloaded from another source, such as a journal article, you may need to make it accessible without the original source document. You can do this, to a certain extent, using Adobe Acrobat Pro. Adobe Acrobat Pro can recognize text, establish a reading order and headers, and create a tagged document.
Note: sometimes these interventions are not completely successful, for example if scanned text is blurred or unreadable, so you may also want to track down an original copy that can be made fully accessible for your student.
Word to PDF
When converting Words to PDFs they must be converted to a tagged format. Enable the “Document structure tags” option in Word, or the “Tagged PDF” option in OpenOffice when exporting, or use the “Make Accessible” plug-in for Adobe Acrobat.
Powerpoint to PDF
When converting Powerpoints to PDFs they must be converted to a tagged format. Click File, then Save As. Choose where you want the file to be saved. Select PDF as the Save As type, then select Options. Check the box for Document structure tags for accessibility. Click OK.
Videos
All videos must be captioned to be accessible. Transcripts alone are not considered accessible, as the law stipulates they must be “timed” captions. Consider these options and guidelines when captioning your content:
- NC State provides captioning grants, and can assist you with getting your videos captioned.
- Panopto will automatically generate captions when videos are recorded. This is done using AI, not a human transcriber, so it is important to check your transcripts for accuracy and edit them if needed. You can make edits to your captions right in the Panopto interface.
- YouTube will automatically generate captions when content is uploaded. These captions are notoriously inaccurate, sometimes getting multiple words wrong in every sentence. If you are using external content you must watch the video in its entirety first to make sure the captions are correct. If you are uploading content and plan to use automatic captions, you should review them and edit them for accuracy.
- Captioning alone may not be sufficient for your Deaf student. Captions tend to be at a higher reading level and they can move quickly. Your student may need additional resources or supports to fully comprehend the captions, such as a transcript, glossary, or summary.
- When feasible, ASL translations for videos should be used. In addition, ASL alongside captions can further increase comprehension and has no negative impact on cognitive load (Yoon & Kim, 2011)
- Audio alone may not be sufficient for your visually-impaired student. Be aware of situations in the video where something is being demonstrated or seen only, with no audio description. In those situations, you may need to provide an alternate description or resource for your student, such as a video description, so they understand the content that was being seen on-screen.
Other Best Practices
Other best practices, which apply in a variety of settings, include:
- Presenting text in a large, readable font
- Ensuring the color contrast for text and important information is high enough
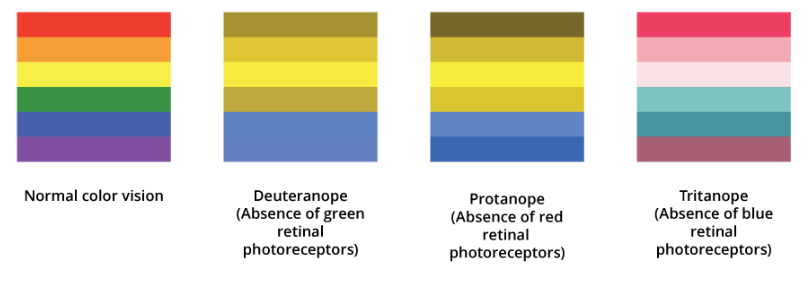
- Be sensitive to using colors, particularly for presenting content or showing contrast, as contrasting colors may look the same for colorblind students.
- Directly link URLs as a hyperlink, do not provide only the text address. When possible, link text should be descriptive, as opposed to writing out the URL address.
- Check functionality and accessibility of all external/linked content (articles, blogs, websites, videos, etc.). When possible or necessary, provide content in alternate formats, such as a tagged document. Be aware of content that auto-plays, redirects, and/or displays prominent ads and how they may be interpreted or identified by screen readers.
Beyond Technical Access
True accessibility goes beyond simply providing a 1-to-1 equivalent for inaccessible content. Context or complexity could still make some content “inaccessible” for your disabled student. Additional resources and supports can go a long way in addressing some of these barriers (Coyner & McCann, 2004; Hertzog et al., 1989; Lang & Steely, 2003; McKeown & McKeown, 2019; Mike & Harrington, 2013; Yoon & Kim, 2011). You can help your student be successful in your course by:
- Providing glossaries or vocabulary support
- Providing resources explaining any contextual/background information
- Providing multiple opportunities to practice and receive feedback
- Writing in plain language, especially for assignment directions and correspondence
- Incorporating graphic organizers for instruction, assignments, and/or note taking
- Present information in multiple formats when possible (written, video, audio, illustration, tactile, etc.)
- Designing based on the principles of universal design for learning
Resources
- Checking Course Content for Captions (from the DRO)
- Accessibility in the Classroom – NC State self-paced online course
- Accessibility Tutorials (documents, .pdfs, websites, etc.)