Customize Learning Experiences for Students: Moodle Lesson Activity
The Moodle Lesson Activity allows instructors to create branching exercises where students are presented with content and then, depending on their responses or choices, are directed to the next stage of the lesson. Instructors can include reading, video, audio, and more as part of the content students use in a Moodle Lesson. This article includes step-by-step instructions for creating a Moodle Lesson Activity.
IMPORTANT: This tool is Moodle-specific and will not be available to use after NC State’s transition to Canvas.
In this article
Getting Started
There are two basic items you will create within a Moodle Lesson:
- Content Pages –can include videos, text, links, and more for students to review to learn content
- Question Pages–multiple choice, essay (must be manually graded), matching, numerical, short answer (fill-in-the-blank), and true/false
More advanced users can also create question clusters.
An “end of lesson” page will be automatically created, but it is recommended that you start your lesson with a content page that explains what students are supposed to do during the lesson and then has the first “jump” to another content page or an initial question page.
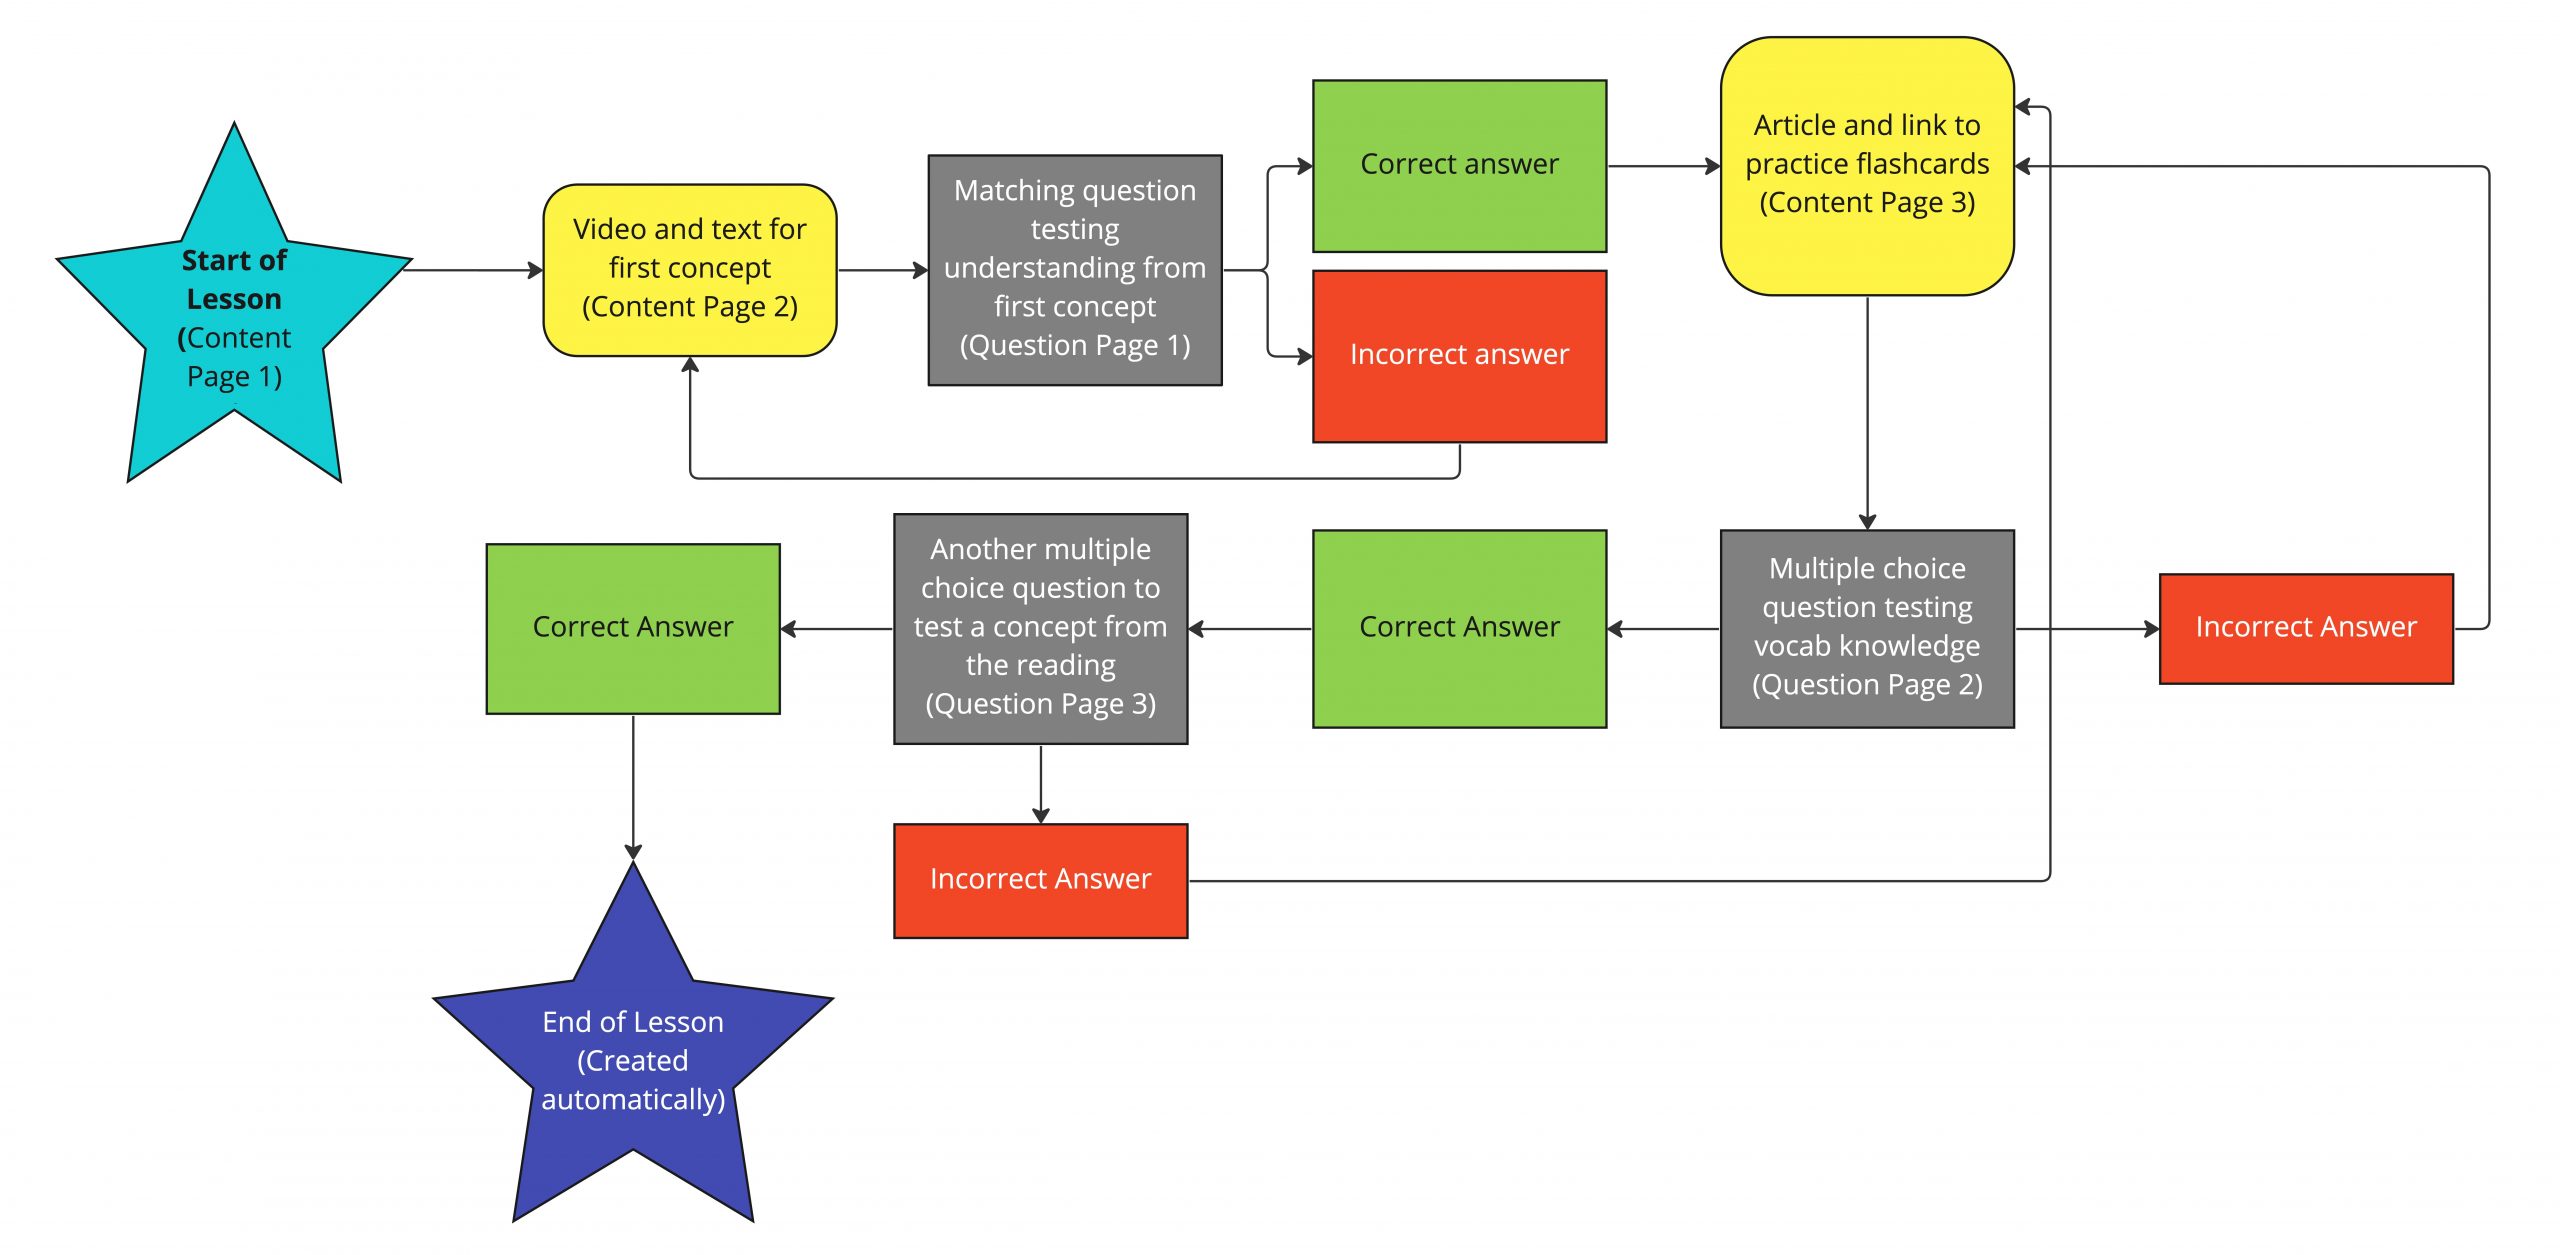
BEFORE diving into Moodle, use paper or a digital sketching tool to plan out your lesson. In the sketch, include the content pages, question pages, and lines showing how these different pages will connect. Digital drawing tools include Miro, Jamboard, Google Drawings, and tablet apps like Freeform for Apple devices.
Moodle Lesson is a more advanced activity type in Moodle. You should feel comfortable using the editor in Moodle to add text, videos, and links before creating a Moodle Lesson.
Moodle Lesson Planning Examples:

Create a Moodle Lesson Activity
When your Lesson is planned out with content, questions, and jumps/connections between the content and questions, you can add the Moodle Lesson activity into a course.
- Name the lesson and select “Save and Display” to add pages. Return to the settings at the end to review grade options and flow control of the Lesson.
- Add the first content page and name it “Lesson Intro” (or something similar)
- In the “Page contents,” add text, video, links, etc., and explain to students what they will do in the lesson.
- Below the “Page contents,” add titles in “Description” for Content1, Content2, etc. for each content page or question page that this intro page will jump to. Set each Jump to “next page” until you have the other pages/questions created. Then you can edit the path by selecting pages you’ve created from the Jump drop-down menu.
- The default is to provide you with four possible jumps from a page. If you need more, adjust the settings for the lesson, and under “Appearance,” set the “Maximum number of answers” to match the most jumps you will have from any one content or question page.
- Create the next content page or question page by choosing it from the “Actions” drop-down menu.
- For content pages, add a title that will be appropriate to show on a jump button. Then add text, videos, links, etc. to the Page contents. For Content1, Content2, etc., name each page/question in the Description and choose “Next page” from the Jump drop-down menu
- For question pages, choose the question type and then “Add a question page.” Fill in the Page title and the Page contents (with the question). and then the correct/incorrect answers. The “Response” field allows you to type feedback to the students that they will see after choosing that answer. Set the jump to “Next Page” and determine any points a student should get in the “Score” field. More info on Lesson question types.
- Repeat these steps to create all question and content pages. Be sure to title them in a descriptive way, so you will know which pages to choose when you edit the jumps.
- From the Lesson editing page, choose the settings gear next to the Actions menu to set the correct Jumps. After creating all content and question pages, the titles of the pages you created will appear in the Jump drop-down menus so you can create the pathways for students. The “Description” for each jump is what will show on the button that a student clicks on to move forward in the Lesson pathway.
- When you have created pages and set the jumps, go back to Settings for the Lesson. Review the Lesson settings consider how it should flow and how students should (or should not) be graded.
- You can test the Lesson/preview the Lesson by selecting it and then clicking on buttons, answering questions, etc.
- If you used open-ended questions, you will use the “Grade essays” button to assign points to student work.
- After students have completed the lesson, select the Reports tab to get a completion overview report and scoring details for student performance on the Lesson. Use these reports to adjust future course instruction, add more course reviews, or move -on in a course if students are ready.
Workshop Information
Moodle Lesson Activity: Create Custom Learning Experiences for Students
If there are no available workshops to register for, please feel free to request an instructional consultation from LearnTech about this topic.