Perfectly Imperfect: On-The-Fly Videos
A good relationship between instructors and learners is important for learners’ emotional engagement and success (Fanshawe et al, 2020). This article discusses how informal, quick, and conversational videos can convey important information and help develop more connections between instructor and learner.
In this article
- What are Perfectly Imperfect Videos?
- Benefits of perfectly imperfect videos
- Uses for perfectly imperfect videos
- Tips for success
- How to create perfectly imperfect videos
- Workshop information
- References
What are perfectly imperfect videos?
Perfectly imperfect videos (PIV’s) typically have some if not all of these features:
- They are short in length (less than 5 minutes long)
- They have a conversational tone
- They require minimal editing before sharing
- They can be recorded anywhere – in the office, outside, more
- They don’t require a lot of preparation
Michelle Pacansky-Brock shares some great examples of perfectly imperfect videos on her website.
Benefits of perfectly imperfect videos
Videos make communication feel more personal, creating a stronger connection than text alone. Through a perfectly imperfect video you can share your authenticity and your enthusiasm, and they can increase your relatability. Since they are quick to produce, these videos allow you to respond in real-time, whether answering student questions, providing feedback, or highlighting timely examples. They also create space to communicate empathy, offering reassurance and support in a way that feels more personal than text alone. And because these videos don’t require a polished setup, they offer flexibility, allowing you to record from home, the office, or even outdoors with minimal preparation.
Uses for perfectly imperfect videos
Brief informal videos can replace any notes or announcements you would otherwise be likely to use text-based communication for. You might use these videos to
- Deliver weekly announcements or a course introduction. Regularly showing your face let’s students know you are present in the course.
- Express encouragement before exams or major assignments. If you know your students are stressed, your tone of voice and facial expressions can convey far more encouragement than text.
- Clarify content just as you might if talking to a student during office hours.
- Share real-world examples of course content you encounter “in the wild” to help students see the relevance of your course to everyday life.
- Supplement written instructions for an upcoming assignment to reinforce what is important.
- Provide student feedback, either individually within an assignment’s feedback section or collectively through an announcement.
- Give tips for success, and respond to student concerns and stressors with compassion, which is more effectively expressed in video than in text.
Tips for success
A few best practices can ensure your videos are clear, engaging and effective even if they are not highly produced or edited. These simple guidelines will help you communicate your message authentically while maintaining student focus.
- Keep it short & focused. Aim for less than 5 minutes. In many cases, you’ll want to use one video for one purpose; if you want to do two separate things with video, create two separate videos.
- Plan your message, but don’t write a script. A thought-out message keeps your content focused, but reading from a script can sound unnatural. An outline or key bullet points can guide your video while keeping the delivery conversational and engaging.
- Make it personal & conversational. Learners connect more when instructors speak naturally and show personality. Show expression, convey emotion and enthusiasm to make these videos work best for you. Speak as if you’re talking to your students in person.
- Consider making some evergreen videos. You might want to reuse a video for more than one course or semester. If you’re making a video that might be appropriate again in the future, avoid mentioning the current semester, due dates, or other time-sensitive details.
- Minimize major environmental distractions. If recording indoors, position the light in front of you so your face is visible, and choose a background with minimal distractions. If recording outdoors, be mindful of background noise, wind, and shifting lighting conditions. In any setting, using a microphone other than the one built into your device can improve audio clarity. If you’re recording on a laptop or mobile device, make sure notifications are turned off to avoid interruptions.
- Consider accessibility. Your video needs to have accurate closed captions to be accessible. Be sure to review and edit any machine-generated captions. When possible, provide a brief text summary or transcript of your video as well. Speak clearly at a moderate pace to also improve comprehension, and avoid pointing to things without describing them.
How to create
Step 1: Plan your message and video
Decide the purpose of your video, what you need to include to achieve that purpose, and how you can best apply the tips above to your video. Create an outline or rough script to guide you through. Use the tips above to help you prepare.
Step 2: Choose your recording tool
Do you want to use your cell phone’s camera, or your computer with a built-in laptop camera or an external webcam? Several key considerations will help you select a tool and application.
- Where are you recording? Cell phones are great for recording quick videos outside, around campus, and more. A laptop will make more sense if you’re sitting at a desk.
- Do you want to show something on a computer screen? If you plan to share your screen, record on your computer.
- How much flexibility do you need? An external webcam can often be positioned for capturing your face at a good angle, which is from slightly above your eye-level.
Step 3: Choose your recording application
Several of NC State’s enterprise instructional technologies can record video. If you don’t have time to experiment with a new technology, use one that you’re most comfortable with that will fit your purpose, and then work to expand your comfort to other applications needed:
- Panopto not only can record video, but it’s also the platform you should be using to store your video, so if you record in Panopto (either on your computer or on the mobile app) you have one fewer step to prepare your video to share. Panopto is easy to use, allows for screen recording, allows for editing and refining, and offers machine-generated captions.
- Zoom is familiar to most and allows for screen recording as well as using a camera. A video recorded in Zoom will need to be downloaded and then uploaded to Panopto for storage and sharing.
- Google Slides allows for recording video and audio right on top of a slide. The video file is stored in your Google Drive and can then be uploaded to Panopto for storage and sharing.
- Other tools like VoiceThread and Yellowdig allow recording directly into their platform. Those platforms can store and deliver your videos so you won’t have to upload them to Panopto. This is only a good choice if you’re already using these tools and your video fits into the purpose of the tool.
Step 4: Practice (optional)
A quick run-through might help you feel comfortable and confident and might make the final video flow more naturally. That said, don’t over-rehearse—the goal is to sound conversational and authentic and not like you’re delivering memorized lines. Practice speaking as if you’re talking directly to your learners in a classroom and pace yourself if you tend to speak quickly. Don’t rush through key points.
Step 5: Record your video
Take a deep breath and go for it! Don’t stress over small mistakes—research shows that mistakes can make you more relatable. Embrace small missteps rather than over-editing them.
Step 6: Upload your video to Panopto
NOTE: If you recorded your video on the Panopto mobile app or Panopto desktop app, your video is already stored in Panopto so you can skip this step and go to Step 7. If you’re sharing in VoiceThread or Yellowdig, skip to Step 7.
You will need to upload any videos not recorded in Panopto that you want to share via Moodle into the Panopto video platform. Moodle is not designed to store large video files and can cause slow load times and playback issues if you upload your video file directly into your course. Using Panopto ensures better performance, accessibility, and ease of sharing.
Uploading via the Panopto Mobile App
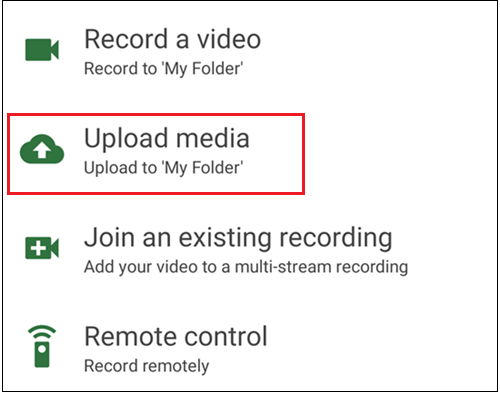
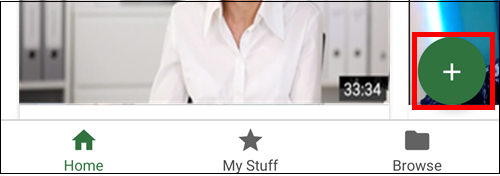
If you have the Panopto Mobile App on your mobile device but did not record your video using the Panopto app, simply open the app, log in using your UnityID and password, Then, click the “+” button (highlighted in the screenshot below) and choose “Upload Media” in the resulting pop-up window (highlighted in the screenshot at right). The video will be stored in “My Folder.” Images sourced from Panopto Support.
Uploading via Panopto on the web
For all other cases (where the video file is on your phone, stored in you Zoom account, or in your Google drive, for example), transfer the file to your computer’s hard drive. Then, log into Panopto on the web, click Create and then “Upload Media.” For more help, see How to Upload Video Files into Panopto.
Step 7: Apply minimal editing
Your goal for editing is to enhance clarity, not achieve perfection. Be sure to edit any captions for accuracy, or add captions if there are none. Simplicity is the key – learners care more about your message than a polished production.
Step 8: Share your video
First, you must adjust the video’s sharing permissions in Panopto so students can view the recording.
You can share your Panopto video in Moodle using one of three methods. Choose the option that works best for your course. You can use the Panopto Activity in Moodle, share the video as a URL resource, or embed the video in the text editor. For full instructions for each of these methods, see the knowledge base article, “Adding Panopto Videos in Moodle.”
Workshop Information
Perfectly Imperfect: On-the-Fly Videos
If no workshops are available, you can request an instructional consultation from LearnTech about this topic.
References
Fanshawe, M., Burke, K., Tualaulelei, E., & Cameron, C. (2020, August 31). Creating emotional engagement in online learning. EDUCAUSE Review.