Best Practices and Tips for Shooting Smartphone Videos
Professional video content creators are finding that using their mobile phones to record video has several major advantages. They're ubiquitous, and compatible with both iOS and Android. At NC State, you can store recorded videos in Panopto or YouTube to share with students.This article will provide helpful tips and best practices for creating high-quality instructional videos using a smartphone.
In this article
Use your phone to make a course welcome video, record content in the field, create quick reminders or tips videos for students, help students visualize a course concept, and more!
How to Get Started
Step 1: Lighting — Shoot Your Video in Bright Areas
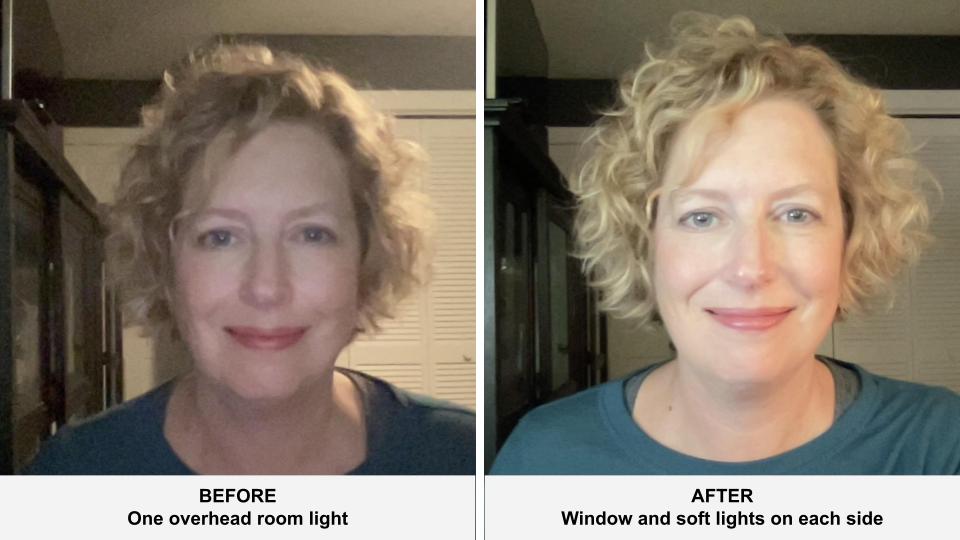
Good lighting is critical and has a huge impact on smartphone cameras because they have smaller image sensors and lenses than traditional cameras. Try as much as possible to shoot your video in brightly lit areas. This will help avoid unnecessary shadows and grainy areas in your video. You should also be careful not to point the camera directly at bright light sources, which will cause unusable overexposed footage and lens flaring.
Lighting should be stable and steady; the image sensors in most smartphones do not react to dramatic changes in lighting very quickly. If the light is still making it tough to shoot your video, try working with back-lighting and white balance settings if your phone or app provides them. Most phones also offer “touch focusing” if your camera focuses on the wrong area of your composition. After setting the focus on the most important aspect of the video, the automatic exposure control will have an easier time making small adjustments if the lighting condition begins to change.
- Video with lighting tips that are easy to accomplish with little to no special equipment
- Suggested lighting for those with glasses to avoid glare
- Lighting equipment to check out from the NC State Libraries
Step 2: Keep your Phone Steady while Recording
This will prevent your video footage from coming out distorted or blurred. Use both hands to hold your smartphone as close as possible to your body as you record the video. Since this can be a bit tiring in long takes or sequences, you can use other ways to support the phone:
- Stabilizers and tripods have perfect handles, which allow you to keep your smartphone still when taking a video with it.
- You can also rest your phone on other physical supports like tables, chairs, desks, shelves, etc.
Step 3: Obtain an External Recording Device or a Directional Microphone
The audio matters as much as the video. If the built-in microphone that comes in your smartphone is of low quality or records wind and unnecessary environmental noises, you may want to use an external, directional mic. If using an external microphone isn’t possible or practical, stay as close to the audio source as possible and try this little trick: use your hand to cover the phone’s microphone (but don’t completely cover it). This way, unwanted noise can be reduced. Also, try to shoot your video in a quiet place, preferably indoors, with less ambient noise.
- Microphones are available for check out from the NC State Libraries (the Royal Voice Lavalier works with smartphones that have an AV jack). Additional microphones are available for purchase at Amazon and other vendors. Search for “smartphone microphone” or your particular type of smartphone, e.g., Android or iPhone. Check the device’s compatibility to ensure it will work with your smartphone.
Step 4: Get Close to Your Subject
Since most smartphones use a digital zoom rather than optical zoom, saying physically close to your subject ensures better image quality, less digital noise and better focus in your videos.
Step 5: Avoid Vertical Video Syndrome
Some videographers who use their smartphones for digital filmmaking often make the mistake of holding their phones vertically, that is to say up and down rather than sideways, while recording. Do not do this! Instead, hold your phone horizontally so that videos are formatted in the same ratio as television and computer screens.
Step 6: Download Mobile Apps to Improve Your Videos
The camera app on your smartphone may do a good job but there’s more to video recording than what most of them have to offer! Some third-party apps (such as FiLMiC Pro) have great features to unlock professional-like features that might bring out your inner filmmaker, such as extending the functionality of the video camera, providing sophisticated editing and digital effects capabilities, and allowing users to immediately upload finished videos for distribution and viewing. Many of these apps are available for both iOS (Apple including iMovie) and Android (Google) mobile devices.
Step 7: Be Prepared for the Shoot
Before you begin recording your videos, make sure that you have all of the gear, props, scripts, actors, and shooting locations ready to go. Additionally, make sure your phone is charged and that you have enough memory available to store the footage. High-definition (HD) video files can get large and will drain a battery quickly.
Best Practices
- Record in Landscape Orientation
Nothing ruins great footage like having two black vertical bars along both sides of your video. To avoid this amateur mistake, make sure to use landscape orientation and not portrait orientation while recording. Not only does landscape orientation make your video seem more aesthetically pleasing in general, it will also make it more enjoyable to watch when viewed on a widescreen or television. Plus, you’ll capture more in the actual video. So just remember: never hold your phone vertically while recording. - Fill the Frame with your Subject or Follow the Rule of Thirds
Completely fill the frame with your subject or try the rule of thirds. This is a guideline for photos and video in which you place your subject in the left or right third of an image to make it more interesting to your viewers. - Avoid Using Digital Zoom
Digital zoom, a feature of most smartphones used to make your subject appear closer, results in a video with copious amounts of pixelation. In order to zoom in while recording without losing the crisp, vivid quality you desire in videos, simply get closer to your subject. In general, you should always get as close as you can, especially for tight shots on faces. - Use Natural Lighting
We’ve all seen those videos where the subject has yellow skin and red devilish eyes combined with super dark backgrounds. The culprit is the flash. Smartphones come equipped with LED lights that are too bright and can easily skew the color temperature of photos. If at all possible, use natural light. - Avoiding Backlit-Settings
You may be able to see people and their faces when they’re backlit, but your smartphone camera usually cannot and it will output footage with a bright light haloing a dark figure. That figure will also have no visible features, meaning you just missed whatever it was you were trying to capture. To avoid this situation, try configuring a basic light setup. Those of you who are recording on the fly can also improve a backlit situation by moving to one side or another. Although some stock camera apps try to reduce the effects of backlighting, you should try reducing the effects on your end as well. - Edit Your Video to Achieve a “Wow” Look
Sometimes a little editing is required to make your footage go from “OK” to “WOW”. Nowadays, you can do some intense editing on your smartphone as well, without needing to invest in fancy (and expensive) desktop software. Everything from basic trimming to adding transitions, titles, and effects is simple on both iOS and Android mobile devices. Whether your next video is a montage or a school project, mobile apps can streamline the video-editing process.
Apple’s own iMovie for iPhone and iPad, for instance, includes titles and transitions and even supports making theatrical trailers on the go. Other features include picture-in- picture, split screen, and slow-motion effects. It’s very similar to iMovie on the Mac, in fact. Adobe’s new Premiere Rush app is a powerful video-editing tool with many of the features of Premiere Pro, though it’s stripped down and can be used by anybody. It offers fast video editing, much like other mobile apps, where you can drag and drop footage and photos in the order you like and trim them down. Finally, there are several apps that allow you to piece together multiple videos. One such example is Magisto, a free app on Google Play and the App Store. Using the Panopto app, you can also record directly to the cloud.
If you plan on spending time editing, make sure that you capture more than you think you’ll need while filming, even with repeated takes. It’s always easier to comb through existing videos than having to go back and re-film something.
Resources
- Harrell, L. S; (n.d.). 7 ways to get professional quality video from your Smartphone. Retrieved from http://vtrep.com/7-ways-get-professional-quality-video-smartphone/
- Sullivan, T. (2018). A beginner’s guide to taking great video on your phone. Retrieved from https://www.nytimes.com/2018/04/17/smarter-living/beginners-guide-phone-video.html
- Tillman, M. (2020). 10 tips for recording better video with your smartphone. Retrieved from https://www.pocket-lint.com/phones/news/131351-10-tips-for-recording-better-video-with-your-smartphone